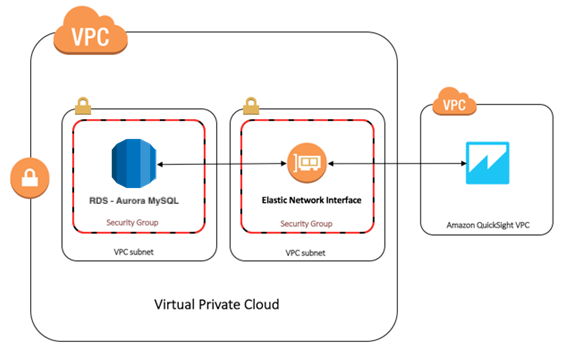
Setup a VPC connection between Amazon Quicksight and RDS
Amazon Quicksight is a business intelligence service within AWS that allows you to quickly create interactive data visualization dashboards for your organization. One of the biggest advantages of using Quicksight over other external BI software is that your data doesn’t have to leave your AWS ecosystem.
In this tutorial I will demo how to setup a VPC connection between Amazon Quicksight and an RDS instance on AWS. I will be using an Amazon Aurora MySQL instance, but the instructions should be very similar for any RDS instance, Redshift, etc. This demo assumes that you already have a data source. Click here for instructions on how to create an Aurora instance. My database contains dummy sales data obtained here: Sample MySQL Data
Amazon QuickSight Account
From the AWS Console, search and navigate to Amazon Quicksight. If this is your first time, you will be asked to sign up. The user accounts created from within Quicksight are separate from AWS accounts/ IAM users. This is useful for inviting the rest of your organization who may not have AWS logins.
You will be given the option to sign up for the Standard or the Enterprise plan. The enterprise plan is required for accessing data through a VPC. See here for a feature and pricing comparison.
Configure Security Groups for access between Quicksight and RDS
- From the AWS Console, go to RDS and select your DB instance (writer). In the Connectivity & Security tab, make a note of the endpoint URL, port number, VPC, and the security group(s).
- From the AWS Console, go to EC2 and select Security Groups under Network& Security from the left-hand menu
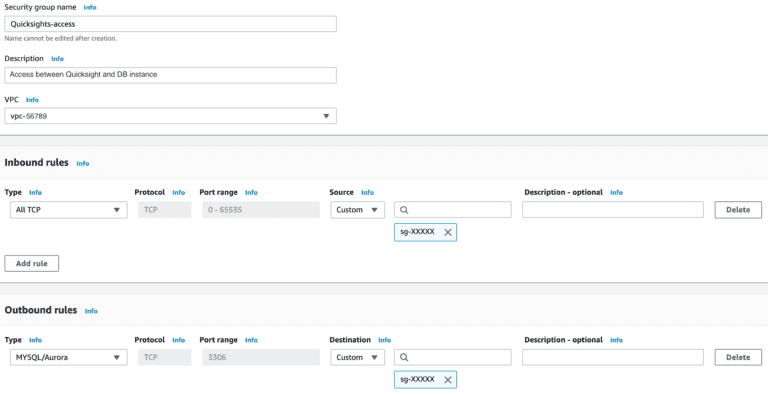
- Create a new Security Group:
- Name your security group
- Select the VPC where your database lives.
- Create an inbound rule where sg-XXXXX is the ID of the security group attached to your RDS instance (as noted in step 1). According to the Quicksight documentation, it needs access to all ports so set the type to All TCP.
- By default, security groups will have an outbound rule that lets all traffic out. Delete this rule and create a new. one of type MySQL/Aurora. Set the port to the port number for your instance, noted earlier. Set the destination to custom and choose the ID of the security group attached to your RDS instance.
- Click save
4. Go to the security group attached to your DB instance (the one noted in step 1) . Click edit* and add a new inbound rule:
- Select MySQL/Aurora for type and enter your port number.
- Under destination, select custom and enter the ID of the new security group you just created in step 3.
sg-YYYYYY represents the ID of the new security group created in step 3.
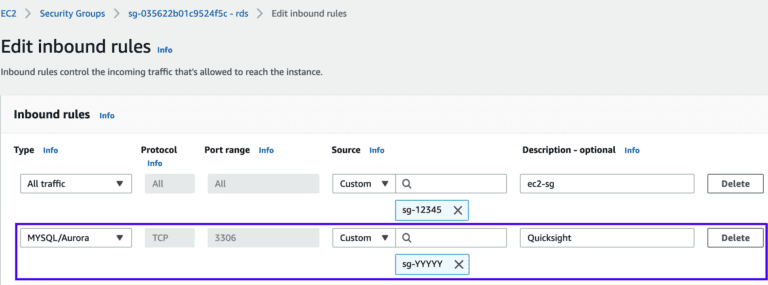
*Note that if you were doing this in a production environment, rather than editing the existing RDS security group, you should create a new security group with this rule and attach it to your DB instance. This way you don’t risk impacting other instances that may be using the current security group.
Creating a VPC connection in Amazon Quicksight
- Head over to Amazon Quicksight. Click the account icon in the top right hand corner and select Manage Quicksight.
- Select Manage VPC Connections from the left hand menu
- Enter the necessary info:
- Give your connection a name
- Select the VPC that your DB is in
- Enter the ID of the new security group created in step 3 of the previous section.
- Click create. VPC connection details cannot be modified once saved. If you need to make changes, you have to delete it and make a new one.

Create a data set in Amazon Quicksight
Click the Quicksight logo in the header to get back to the main area. Select Datasets from the left-hand menu. Click the New Dataset button.
- Give your data source a name.
- Select your RDS instance
- Select the VPC connection you created in Quicksight earlier
- Enter your database name, username and password. These are the settings used to connect to the actual database on the instance.
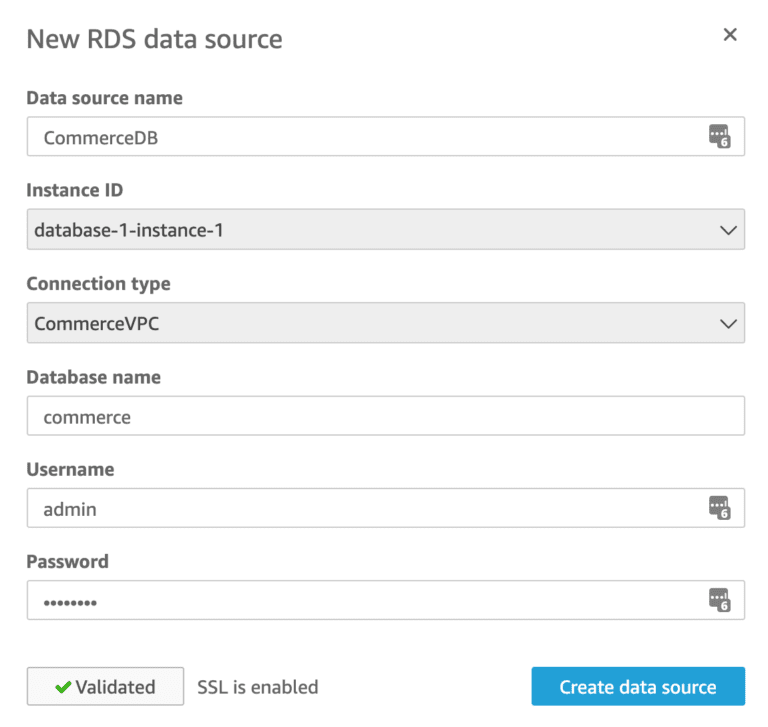
Once you’ve filled out all the settings, click Validate to test the connection. If you receive an error message that the connection took too long, this likely means that Quicksight is unable to reach your database. Double check your security group settings to make sure all the right access has been added and try again. If it says validated, as shown in the screenshot, you’re all set. Click Create data source to import your data into Amazon Quicksight.
Now that your data source is connected, we can finally move on to the fun part! Check out part 2, where we will build out an actual data visualization dashboard in Amazon Quicksight.